Learning to use a La Pavoni, step by step

Dive into the fascinating world of La Pavoni lever espresso machines through this detailed guide that helps you master every step of your preparation.
Although very busy in recent months, I've decided to take my caffeinated blog back in hand. Today, I'm offering you a step-by-step tutorial on all the steps that allow me to successfully make my coffee with a La Pavoni lever machine.
La Pavoni lever machines are very sensitive: the slightest mistake is felt immediately in the cup. When starting out, the first coffees are often failures. Don't panic: with practice, you refine your technique and establish a reproducible protocol to succeed with all your espressos.

Essential points for making a successful espresso with a La Pavoni lever machine
Use suitable water
Favor low-mineralization bottled water: better taste, less limescale deposits, and therefore better protected equipment.
It is of course also possible to use filtered water. For my part, living in a region where the water is low in limescale, I get excellent results with a Brita glass filter pitcher.
Choose your coffee beans carefully
The choice of beans determines the quality in the cup. Buy from a roaster rather than a supermarket: fresher coffee, controlled roasting profile and clear traceability.

There is much to say about the roaster vs supermarket difference — a topic detailed in this article.
Regarding origin, this book inspired me to write Coffee Producing Countries.
Invest in a precise coffee grinder (manual or electric)
With a La Pavoni (and any semi-professional machine), grinding fresh is essential. Pre-ground coffee will not work. Invest first in a good grinder.
1Zpresso J-Ultra Review: Premium Manual Espresso Grinder
Review of the 1Zpresso J-Ultra: 48 mm burrs, 8 µm precision, retractable handle. The premium manual grinder for espresso — handling, grind quality, and verdict.
Read the article →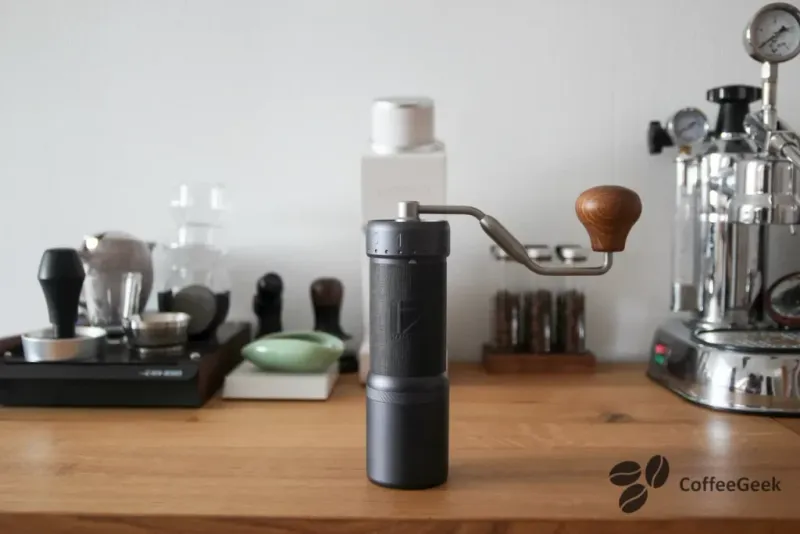
- For a quality manual grinder, I recommend the 1Zpresso J-Ultra, appreciated for its precision and ease of adjustment. I discuss it in more detail in this article.
- If you prefer a more accessible option, the Kingrinder K6 is also a very good choice. I present it here.
Always use the same amount of coffee
As in baking, a consistent recipe = consistent results. Test dose and grind, then set your recipe until you change beans.
Selection of Coffee Scales
Why weighing coffee is essential for consistent results — a selection of coffee scales for all budgets, from compact models to espresso scales with timers.
Read the article →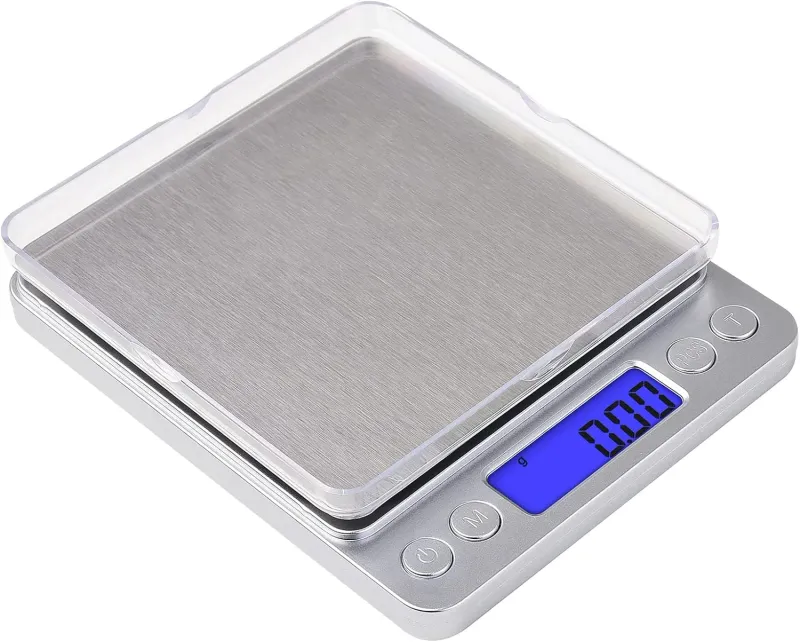
My first choice was the Timemore Black Mirror (1st generation, now discontinued).
It was accurate and minimalist (simple weighing and timer, without ratio calculations), but had a minor flaw that has since been corrected.
I now use the Timemore Black Mirror Nano Scale, with which I am very satisfied.
However, its price has increased over time, which slightly reduces its initial value for money.
If I had to choose a scale today, I would probably go for the Normcore V3 Scale, which is less expensive, compact and practical to use.

Maintaining Your Equipment Properly
Good maintenance extends longevity and quality in the cup.
How to maintain a La Pavoni?
Discover how to extend the lifespan of your La Pavoni espresso machine through regular maintenance.
Read the article →
How to Use a Lever La Pavoni?
Now that the basics are established, let's move on to practice. Post your questions in the comments if needed, I'll be happy to answer.
1. Preheat the machine
Turn on the machine and let it heat up for about 10 minutes, then complete the temperature rise by running water through the shower screen.
If a La Pavoni is left on too long, the machine eventually overheats, which causes water that's too hot and risks burning the coffee during extraction.
2. Weigh & grind
During heating, weigh and grind the coffee (e.g. 16 g, fine grind by hand).


RDT: add 2–3 drops of water to the beans before grinding to prevent static from sticking the coffee in the grinder (learn more).
3. Pour the coffee into the portafilter
Use a dosing funnel: it's very practical to avoid waste.

Find a 51 mm funnel on Amazon.
This is a non-essential accessory, but really very useful to avoid getting coffee everywhere when filling the portafilter.
4. Distribute the coffee evenly
There is a wide range of accessories dedicated to this preparation step. However, the two main ones used by baristas are the WDT and the distributor.
The goal is to achieve a perfectly uniform density of the grounds in the filter. This helps prevent the channeling phenomenon, which causes poor extraction and therefore an unbalanced coffee.
4 tips to avoid channeling with a bottomless portafilter
Discover how to avoid channeling during your espresso extractions with a bottomless portafilter.
Read the article →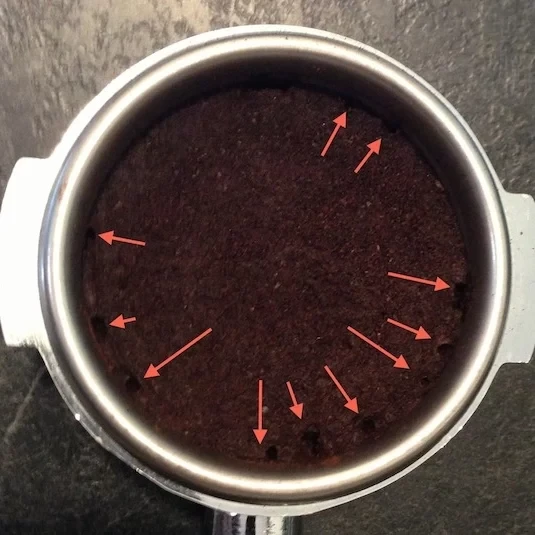
Generally, you use either one or the other accessory, not both in succession — although that remains possible.
Distribute the coffee using a WDT
The WDT (Weiss Distribution Technique) is a tool that allows you to evenly distribute the grounds in the portafilter to improve the extraction quality of the coffee.
To use it, simply gently stir the grounds with its fine needles, which breaks up clumps and homogenizes the distribution before tamping.


The WDT tool is very effective at preventing channeling.
You can either make your own (for example with thin wires and a cork), or buy a ready-made one on Amazon.
Distribute the coffee using a distributor
The coffee distributor is an accessory that helps level the grounds in the portafilter to achieve a flat and even surface before tamping.
To use it, simply place it on the filled portafilter, turn it slightly to distribute the grounds evenly, then remove the accessory before tamping.


The distributor is a practical tool for reducing the risk of channeling.
You can get one on Amazon.
5. Tamping
Tamping the coffee is an essential step that must be performed consistently. To achieve uniform extraction from one coffee to another, it's important to:
- Tamp perfectly level: this prevents one side from being more compressed than the other.
- Apply consistent pressure: generally between 13 and 20 kg, depending on individual preferences.
For a long time, I used a standard tamper purchased on Amazon for a few euros. Later, I invested in a model equipped with a guide, the Normcore V4 tamper, to ensure level tamping and consistently identical pressure.
Such a tamper helps reduce the risk of channeling, but it's not an essential accessory like the WDT can be. In reality, what matters most is getting a good feel for your tamper and staying consistent in your technique.

6. Rinse the shower screen & preheat the cup
Place a cup under the shower screen and lift the lever to run some hot water:
- finish heating the piston,
- heat the cup (coffee doesn't like thermal shocks),
- rinse any residue from the previous extraction.

7. Extraction: two valid methods
- Method 1 (my favorite)
- Method 2
This approach often gives slightly more volume (smaller air bubble between piston and coffee than with method 2).
- Raise the lever to the limit of flow
- Lock the portafilter
- Raise the lever fully
- Pre-infusion 5–10 s
- Lower the lever with resistance (~14 kg)
- Lock the portafilter
- Raise the lever gently (avoid suction)
- Pre-infusion 5–10 s
- Lower the lever with resistance (~14 kg)
To learn more about the force to apply to the lever to reach 9 bar of pressure, I invite you to check out this article.
Never raise the lever too quickly with the portafilter locked: the suction can crack the puck, causing channeling and poor extraction. This is what is called channeling.

9. After the flow
Do not remove immediately the portafilter: it is still under pressure. Wait for the dripping to stop before ejecting the puck.
The puck should be compact, without standing water or cracks. At first, check it systematically. Remember to recycle your coffee grounds.
Tutorial videos
Second take (improved sound and framing):
How to determine boiler temperature via pressure?
There is a pressure → temperature conversion formula. I explain everything in this article: converting pressure to temperature.
How to convert pressure gauge reading to temperature?
Learn how to convert boiler pressure to water temperature using the Clapeyron formula, to optimize your espresso extraction.
Read the article →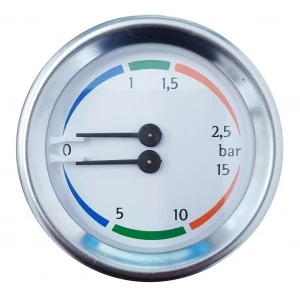
Common problems & quick solutions
| Problem | Probable Causes | Solutions |
|---|---|---|
| Water flows too fast | - Not enough coffee - Grind too coarse - Cracked puck - Coffee not fresh enough (often from supermarkets) - Pre-ground coffee | - Add a bit more coffee - Grind finer - Lift the lever more gently / prefer method 1 - Buy fresh coffee from a roaster - Switch to whole bean coffee and grind just before |
| Water doesn't flow | - Too much coffee - Grind too fine - Piston too hot | - Reduce the dose - Grind slightly coarser - Reduce heating time / less flushing |
| Chaotic flow (without spouts, more visible) | - Uneven distribution or tamping (steps 4–6) - Micro-cracks in the puck | - Review WDT + leveler + tamping - Lift more gently / adopt method 1 |
| Everything flows well but the taste is not good | - Unsuitable water temperature | - If bitter/burnt taste → reduce heating / flushing - If acidic taste → slightly increase heating |
| No crema | - Lack of coffee freshness | - Buy fresh coffee - Favor a blend with robusta (more crema than arabica) |
Update your protocol as you go (dose, grind, pre-infusion). Note your settings: consistency is key on a La Pavoni lever machine.